Thursday, January 16, 2014

Dyed silks, Naturally

Wondering what these odd looking jars on my counter are filled with? We really love making play things over here, and today I thought I would give you a loose tutorial on how we like to make our play silks. No one needs more chemicals in their lives or in their toys, so when we color our silks, we like to do it as naturally as possible.
So how do we color our silks? Largely with things from the kitchen or the garden, depending on the season. When my son and I decided to do some yesterday, we hit the spice rack first. A few generous tablespoons of turmeric landed in the first jar, paprika in the last. Then we chopped up a beet from our root cellar (grown last summer in the garden!) and in the final jar we put a few heaping tablespoons of ground coffee. A few tablespoons of vinegar went into each jar (all measurements were done by a 3 year old, so you can be sure, they were not exact!) and then I poured boiling water into each jar.
 We stirred (wearing over mitts!) with chop sticks, added a silk to each jar and put lids on them.
Then we forgot about them and went to paint. After 24 hours on the counter (even better on the window sitting in the sun!!) we remove the silk from it's dye bath and rinse it well with color water.
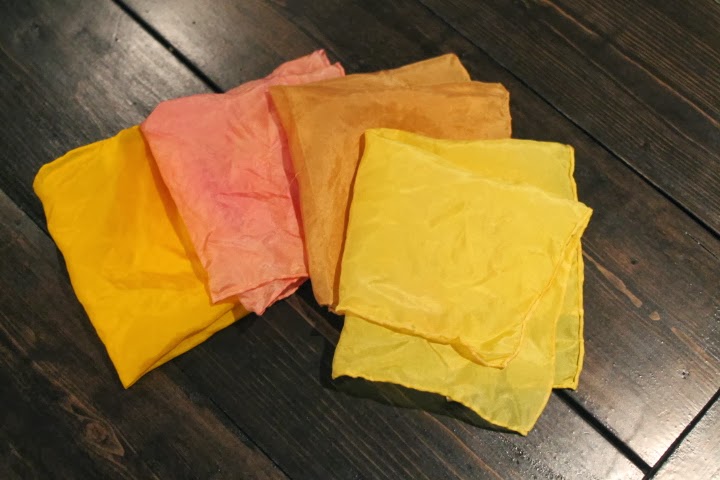

 
The results?
 
Beautiful.


Sunday, January 12, 2014

Candy Free Easter


Does anyone else out there do candy free Easter baskets? At our house, Easter is a simple celebration of Spring. But planning a plastic free, sugar free Easter can be tricky. With the stores brimming with sugar laden treats full of artificial flavors and preservatives, and shelf after shelf of cheap plastic garbage, it can certainly seem like the only choice.


Thankfully, it isn't. Not by a long shot.


We use wool felt eggs for our Easter egg hunt. They are so easy to make and feel far nicer than plastic ones. These ones in fact were largely kid made. We fill ours with blueberries, pomegranate seeds and raspberries, so I don't mind when the first thing he eats on Easter morning is the contents of his eggs.

As for our Easter baskets themselves, we line them with a few mini silks in vibrant colors and stuff them with a few of the items on the list below:


-Bubbles
-Seeds
-Watercolor paints
-fruit teas
-A small doll
-Small wooden toys
-A skipping rope
-Chalk
-A small jar of homemade play dough
-A hand kite
-Homemade Marshmallows
-Felt food
-A simple knit hat (early Spring is still cool here in Atlantic Canada!)
-A beeswax candle

What's in your Easter Basket?

Wednesday, January 8, 2014

Waldorf Bunnies


I just wanted to take a moment to share our newest bunny babies for Easter. We had such a great response to our last baby we introduced here that I thought you might enjoy seeing these little ones as well. Our his and hers bunnies are made with orange organic cotton velour and are stuffed with wool. I hope you love them as much as we do!

Friday, January 3, 2014

Our Newest 'Baby'

If you will indulge me for a moment, I'd like to introduce you to the newest baby in our shop.
We are just in love with this little guy, and I think you will be too! Granted, he's a bit big for his bed, but I foresee a smaller bed in his future. And actually, a new blanket too. But in the meantime, here he is, and I hope you think he's as sweet as we do!

DIY Play Kitchen


When I look around our play area, it's evident to me that we were interested in making our own toys long ago. This is in fact the first toy we ever attempted ourselves. It's far from perfect, and in retrospect, I'm sorry we painted it. I wish we had left the wood without color. But the reality of this particular piece is that it started it's life as a TV stand. Have an old piece of furniture that you would like to breathe new life into? You With minimal skills, you can definitely do this too.

I wish I had pictures of the process to share, but at the time, I didn't take any. Regardless, it's easy. First thing first, we took the awful castors off of the bottom of this and sanded it down. We bought a simple metal bowl and traced it onto the top of our kitchen. We cut a hole slightly smaller than what we traced. We cut four wooden circles from thin wood (2 bigger, 2 smaller) and painted them black. Next, we added a piece of wood to divide the 'oven' from the other door (which is sometimes a fridge, sometimes a pantry, etc). We cut doors to fit these two spaces, added hinges and hardware and did all necessary painting. The circles got glued to the top, we designed a simple hutch based on the width of the piece and finally added four wooden drawer pulls for knobs.

The space underneath is ample for a large basket, which is where we store our felt food. In the future, I foresee a smaller kitchen moving in (something with the wood grain showing and a lot more Waldorf in style) but in the meantime, this was a project that cost us about $25 when you factor in what we found in our basement, and has served us well for nearly 4 years. You could turn anything into a kitchen, from a small dresser, to a night stand, to an end table or TV stand. I would love to see what you come up with for your own play space!

Easy Beeswax Polish


When we make our wooden toys here in Ginger Forest we always finished them with a light coat of beeswax polish. It gives the toys a wonderful feeling and while still allowing the feeling of the wood to come through. As these toys get played with, it is advisable to reapply a coat of polish every 6 months to a year (use your own discretion). Whether you are polishing up our toys or ones you've lovingly made yourself, it is easy to make your own polish at home with just a small amount of effort.

All you'll need is a heat proof container ( I like mason jars) a pot for water, a block of beeswax and some olive oil. It really couldn't be easier. Cut or grate a chunk of beeswax from the block and place it in your jar. Set the jar into a pot with some water, and put it to simmer on the stove top. Let it melt slowly, so resist the urge to set the burner to high. Once it's melted and you can see more clearly what the amount in your jar is, add olive oil to a ratio of 1 part beeswax 3 parts olive oil. I recommend using organic products whenever you have the option. You'll notice that the addition of olive oil may cause your beeswax to solidify slightly, but not to worry. Let it continue to simmer in the pot of water until everything is melted. At this point, you can add a drop or two of essential oil if you like (for our shop, we do not, as some people don't enjoy it). Carefully remove the jar from the heat and leave it on the countertop to cool. When it is completely solidified, you can scrap a small amount off and polish your beautiful toys with it. We recommend using a soft cotton or felt cloth to do this.

That's all there is to it! Happy polishing!

Nature Table

Well, we've just passed the Winter Solstice and slowly we are working our way toward Spring. So what's on your nature table? At our house (today anyway) we have a division from Winter into Spring.